


Clipper guard sizes: quick chart and how to choose
Clipper guard sizes tell you exactly how much hair will remain after the cut. Higher numbers leave more length; lower numbers leave less. A #1 guard leaves roughly 3 mm (1/8 in), a #4 leaves about 12.7 mm (1/2 in), and a #8 leaves a full 25.4 mm (1 in), according to Wahl’s guide comb documentation.
| Guard | Inches | Millimetres |
|---|---|---|
| #0 (no guard) | ~0 | ~0.5–1.5 |
| #0.5 | 1/16 in | ~1.5 mm |
| #1 | 1/8 in | ~3 mm |
| #2 | 1/4 in | ~6 mm |
| #3 | 3/8 in | ~10 mm |
| #4 | 1/2 in | ~12.7 mm |
| #5 | 5/8 in | ~16 mm |
| #6 | 3/4 in | ~19 mm |
| #7 | 7/8 in | ~22 mm |
| #8 | 1 in | ~25.4 mm |
Three rules to keep in mind before you cut:
- Always start with a longer guard than you think you need. You can always go shorter; you cannot undo a cut.
- Half-guards and the taper lever give you fine control between standard sizes without switching guards entirely.
- Guards measure the hair that stays, not the hair that comes off.
Key takeaways
Clipper guard numbers measure the hair that remains after cutting, with each full step adding roughly 3 mm, and the taper lever giving fine control within any single guard size.
| Point | Details |
|---|---|
| Guards measure hair left | The number tells you remaining length, not how much is removed. |
| Each step adds ~3 mm | Full guard numbers increase by roughly 3 mm (1/8 in) per step, from #1 at 3 mm to #8 at 25.4 mm. |
| Lever adds fine control | Moving the taper lever from closed to open adds roughly 0.5–1.5 mm within a single guard size. |
| Start longer for safety | Beginners should start at #3 or #4 and work shorter; going too short too fast cannot be undone. |
| Salonbrandz for Canadian buyers | Full guard sets, replacement guards, and blade care supplies are available at Salonbrandz with Canada-wide shipping and Scarborough pickup. |
Table of Contents
- What do clipper guard sizes actually measure?
- How guards, blades, and the taper lever work together
- What each guard from #0 to #8 actually looks like
- How to choose the right guard, create a simple fade, and maintain your clippers
- Tips from Canadian pros: what to buy and what to avoid
- Common mistakes when choosing and using clipper guards
- Do guard sizes vary across clipper brands?
- How the taper lever gives you more than two positions
- What I tell clients about guard sizes
- Where to find guards and professional clippers in Canada
- Sources
- FAQ
What do clipper guard sizes actually measure?
The table above covers the basics, but the full picture includes half-guards and lever positions that shift effective length. According to StyleSeat’s haircut number guide, the standard range runs from #0 (near-skin) through #8 (approximately 1 inch), with each full step adding roughly 3 mm.
The closed and open lever figures for #1 through #4 come directly from the Wahl guard length chart, which lists #1 closed at 3.0 mm and #1 open at 4.5 mm. Open lever values for #5–#8 are approximate, as published specs vary by model.
Conversion callout: 1 inch = 25.4 mm. Each full guard step adds roughly 3 mm (1/8 in). So if you know the guard number, multiply by 3 to get a rough millimetre estimate for guards #1–#4.
How guards, blades, and the taper lever work together
The guard does not cut hair. It holds the blade a fixed distance from the scalp, and the blade cuts whatever extends past that gap. That distinction matters because it means the guard controls the floor, not the ceiling.
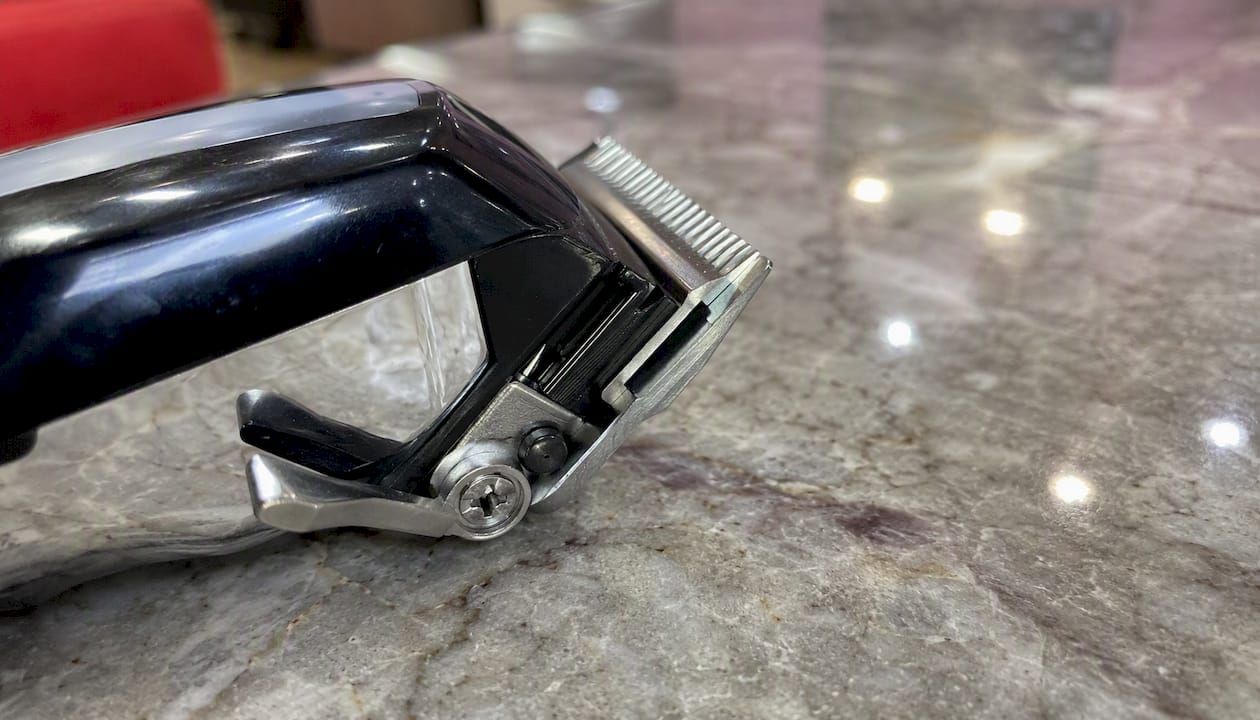
The taper lever shifts the blade position incrementally. Wahl UK’s cutting length guide explains that moving the lever from closed to open increases the effective cutting length by a measurable amount, making it useful for blending and tapering without swapping guards. In practice, that shift runs roughly 0.5–1.5 mm depending on the clipper model and blade type.
Closed lever means the blade sits at its lowest position, cutting the shortest length for that guard. Use it for your final pass or when you want a clean, defined result.
Open lever raises the blade slightly, leaving a touch more length. Barbers use this during blending passes, particularly when transitioning between two guard sizes in a fade. It acts as a half-step, so you get a smoother gradient without a visible line.
Blade sharpness and cleanliness also affect the result. A dull or dirty blade pulls hair rather than cutting it cleanly, which can make the finished length look uneven even when the guard is correct. Guard fit matters too: a loose or cracked guard can sit unevenly against the scalp and produce inconsistent lengths across the same pass.
What each guard from #0 to #8 actually looks like
Understanding the numbers is one thing. Knowing what each guard produces on a real head is another.
- #0 / no guard: Near-skin length, roughly 0.5–1.5 mm. Used for skin fades, edge clean-ups, and stubble lines. On its own, it leaves a shadow rather than visible hair.
- #0.5: About 1.5 mm. A step above skin, common for tight fades and the lower sections of a high fade. Bridges the gap between bare blade and #1.
- #1: 3 mm closed. The go-to for short buzz cuts and tight sides on a crew cut. On fine hair it reads almost skin-close; on thick or coarse hair it shows more texture.
- #1.5: Approximately 4.5 mm. A half-guard that sits between #1 and #2, useful for a slightly softer taper without the jump to 6 mm.
- #2: 6 mm. One of the most-used guards in barbershops. Classic short sides, the lower section of a mid-fade, or an all-over buzz that still shows some length. Sacred Barbers’ guard number guide lists #2 at 1/4 in (approximately 6 mm) and notes it as a standard fade starting point.
- #3: 10 mm. Short but clearly visible. Works well as an all-over length for a low-maintenance look, or as the mid-section in a fade sequence. Sacred Barbers puts #3 at 3/8 in (~10 mm).
- #4: 12.7 mm. Medium buzz territory. Common for the top in a classic crew cut when paired with a #2 on the sides. Suits most hair types without looking too short or too long.
- #5: About 16 mm. Noticeably longer than a buzz. Often used on the top of the head when someone wants length without scissors.
- #6 / #7: 19–22 mm. These guards leave enough length to show natural texture and movement. Less common in fade work; more useful for longer clipper-over-comb styles.
- #8: 25.4 mm (1 inch). The longest standard guard. Rarely used for sides; mainly for longer all-over styles or as a starting length before scissor work.
Half-guards (#0.5, #1.5, #2.5) bridge the 3 mm gaps between full numbers. They are especially useful in fade sequences where a full-step jump would leave a visible line.
Hair type changes how each guard reads. Thick or curly hair appears shorter than straight hair at the same guard setting because the curl compresses the length. A #3 on tight coils can look closer to a #2 on straight hair. A quick rule: go one guard longer than you think you need if your hair is dense or curly.
Common guard combinations:
- Skin fade: #0 at the nape, #1 at the sides, #2 blending up, #3 or #4 on top
- Classic crew cut: #2 sides, #4 on top
- Short all-over buzz: #3 or #4 throughout
- Longer buzz with texture: #5 or #6 all over
For more on which clipper handles these looks best, the clipper vs. trimmer breakdown at Salonbrandz covers the practical differences.
How to choose the right guard, create a simple fade, and maintain your clippers
Choosing a guard
Start at #3 or #4 if you are new to cutting at home. That length is forgiving: short enough to look intentional, long enough to correct if you go uneven. Test a small section near the nape before committing to the full head.
For hair type guidance on when a professional cut makes more sense than DIY, this salon selection resource is worth a read.
Simple at-home mid-fade sequence
- Start with a #3 or #4 at the sides, moving upward from the nape to about two fingers above the ear.
- Switch to a #2 and repeat the same path, stopping about one finger lower than the #3 line.
- Use a #1 (lever closed) from the nape up to just above the hairline.
- Blend the transitions with the lever open on each guard, moving in short upward flicks.
- Finish the top with scissors or a #4–#6 depending on desired length.
- Check with a hand mirror before removing the cape. Turn the clippers off and look at the back and sides in good light before declaring it done.
Maintenance checklist
Blade condition directly affects length accuracy and comfort. Salonbrandz’s guide to maintaining professional hair tools covers this in detail, but the core habits are:
- Brush hair out of the blade after every cut
- Oil the blade with two drops of clipper oil before and after use
- Check blade alignment if the clipper starts pulling
- Replace blades when oiling no longer restores smooth cutting
- Clean plastic guards with warm water and a soft brush; never soak metal guards in water
Pro Tip: Before finishing any cut, switch the clippers off and use a hand mirror to check the back. What looks even in motion often shows lines or uneven blending when you stop and look carefully.
Tips from Canadian pros: what to buy and what to avoid
Buying guards in Canada comes with a few practical considerations that generic guides skip.
- Buy a full set from #0 to #8. ProStylingTools’ professional guard sets confirm that barbers keep the full range on hand. Buying individual guards later costs more and risks getting mismatched sizes.
- Prefer metal-fitting guards for professional use. Plastic guards work fine for occasional home cuts, but metal-fitting guards hold their shape longer under daily salon use and seat more consistently on the blade.
- Keep a half-guard set. The #0.5, #1.5, and #2.5 guards are the ones most home cutters skip and then regret. They are the difference between a smooth fade and a visible line.
- Match guards to your clipper model. Universal clipper guards exist, but fit varies. A guard designed for your specific model seats correctly and gives accurate lengths. Off-brand guards can sit slightly high or low, shifting your result by 1–2 mm.
- Check local warranty and after-sales support. Canadian buyers benefit from purchasing through a Canadian supplier when a blade or guard needs replacing quickly, rather than waiting on cross-border shipping.
Pro Tip: When buying replacement guards, bring your clipper model number. Guards labelled “universal” often fit Wahl or Andis-style attachments but not both. Confirming compatibility before you buy saves a return trip.
Salonbrandz carries guard sets, replacement guards, and blade care supplies with in-store pickup available in Scarborough. For a full breakdown of which clippers pair best with which guard systems, the best barber clippers guide at Salonbrandz is a useful starting point.
Common mistakes when choosing and using clipper guards
Most bad home haircuts come down to a handful of repeatable errors.
Going too short too fast is the most common. Skipping from a #4 to a #1 in one pass leaves no room to blend and no way to fix the result without going shorter everywhere. Work down in single steps.
Using the wrong guard for the clipper model is the second. A guard that does not seat flush on the blade rocks slightly during the cut, producing an uneven surface. If your guard wiggles when attached, it is the wrong fit.
Cutting with a dirty or dry blade ranks third. Hair oil and product residue build up on blades quickly. A blade that has not been oiled pulls rather than cuts, which feels uncomfortable and produces a rougher finish at the same guard setting.
Forgetting the lever position is a subtler mistake. Starting a cut with the lever open and then switching to closed mid-section changes the effective length mid-pass. Pick a lever position before you start each section and keep it consistent.
Finally, skipping the mirror check. Cutting the back of your own head without a second mirror means you are guessing. Uneven blending at the nape is the most common thing people miss.
Do guard sizes vary across clipper brands?
They do, and the variation is more significant than most guides admit. The numbering system is a convention, not a standard. A #3 from one manufacturer may leave 10 mm; the same number from another brand may leave 9 mm or 11 mm. The difference feels small on paper but is visible on a finished cut.
SkullShaver’s guard size explainer notes that standard guards step by roughly 1/8 inch (~3 mm) per full number, but that figure assumes the guard seats correctly on the blade it was designed for. Cross-brand use breaks that assumption.
Wahl, Andis, and Oster each use slightly different blade widths and guard attachment systems. Wahl’s snap-on guards are not interchangeable with Andis lever-style attachments without an adapter. Some “universal” guard sets advertise compatibility with multiple brands, but the fit is often approximate rather than precise.
For professional work, the safest approach is to use guards made for your specific clipper model. For home use, a universal set is usually fine as long as you test the fit before cutting and verify the actual length with a ruler on the first use.
Regional differences are minimal within Canada, but imported clippers sold in some markets use metric-only guard labelling (e.g., 3 mm, 6 mm, 9 mm) rather than the number system. The lengths are equivalent; only the labelling differs.
How the taper lever gives you more than two positions
Most guides describe the taper lever as a simple on/off: closed for short, open for longer. The reality is more useful than that.
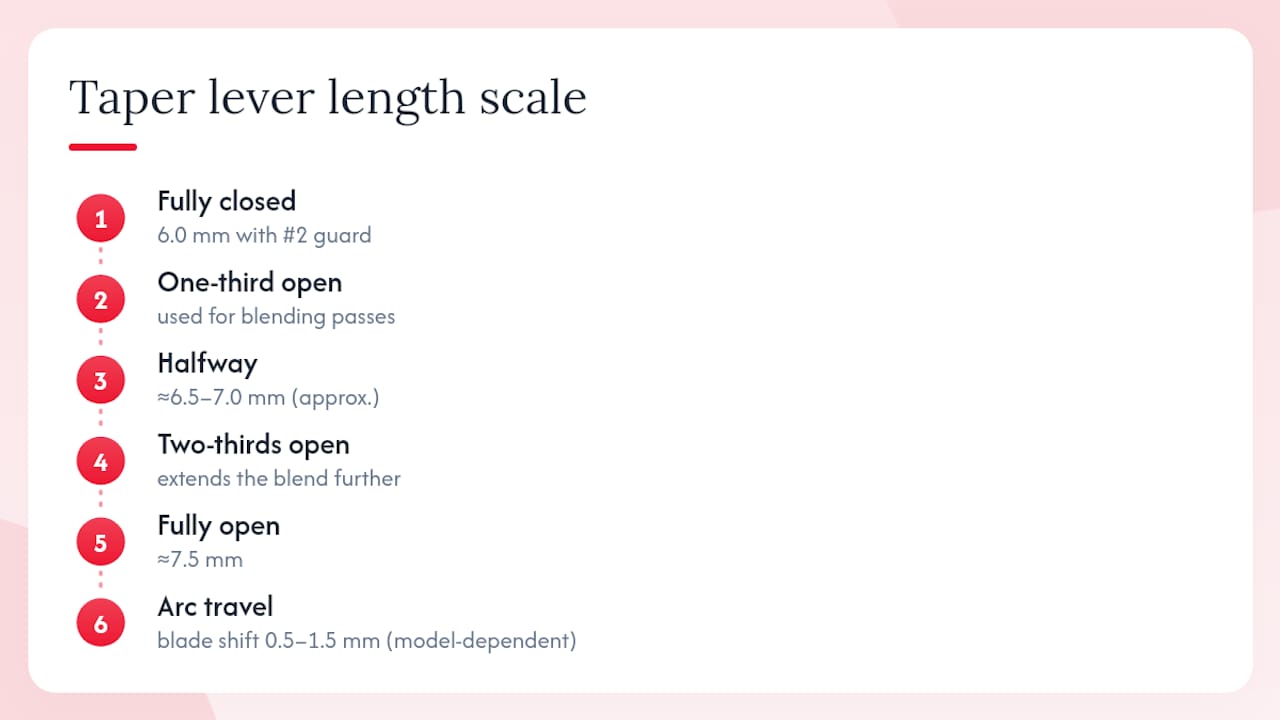
The lever moves on a continuous arc between its two endpoints. Every position between fully closed and fully open is a valid cutting length. That means a single guard gives you a range of lengths, not just two options.
In practical terms, the lever on a Wahl clipper moves the blade approximately 0.5–1.5 mm across its full travel, depending on the model. A #2 guard at closed position cuts 6.0 mm. The same guard with the lever halfway open cuts roughly 6.5–7.0 mm. Fully open, it reaches approximately 7.5 mm. That is three distinct lengths from one guard, without touching the guard set.
Barbers use this for blending passes. After cutting the lower section with a #1 closed, they move to a #2 with the lever set to about one-third open and work the transition zone. The result is a gradient rather than a line. Switching the lever to two-thirds open for the next pass up extends the blend further without jumping to a full #3.
The key is consistency. If you change the lever position mid-pass, you change the length mid-pass. Set the lever before each pass, complete that pass fully, then adjust for the next one. Treating the lever as a continuous tool rather than a binary switch is what separates a smooth fade from a choppy one.
For a full breakdown of how to build a home or professional setup that takes advantage of this kind of control, the complete barber setup guide at Salonbrandz walks through guard sets, lever technique, and tool selection together.
What I tell clients about guard sizes
The number on the guard is not a style decision. It is a measurement. The style decision is what you do with that measurement: which guards you combine, how you use the lever between them, and where you transition from one length to the next.
The mistake I see most often is treating guard numbers as a shorthand for a whole haircut. Asking for “a number two” without specifying where the #2 goes, how high it rides, and what happens on top leaves too much open to interpretation. The clearer the instruction, the closer the result matches the expectation.
For anyone cutting at home, the single most useful habit is to write down what you used last time. Guard number, lever position, where you transitioned. That note is worth more than any chart because it is calibrated to your specific hair, your specific clippers, and your specific result.
Where to find guards and professional clippers in Canada
Professional-grade guard sets and replacement blades are harder to source locally than most people expect. Salonbrandz stocks a full range of clipper guards, replacement guard sets, and blade care supplies from brands trusted in Canadian salons, with nationwide shipping across Canada and in-store pickup available in Scarborough near Toronto.

Whether you need a complete #0–#8 guard set to start, a specific half-guard to fill a gap in your kit, or clipper oil and cleaning supplies to keep your blades cutting accurately, Salonbrandz carries what Canadian barbers and home users actually need. Browse the full selection or visit in store to get matched with the right guards for your clipper model.
Sources
- Haircut Number System: Understanding Clipper Guard Sizes | StyleSeat
- Wahl Clippers Guard Lengths in mm | PDF
- Hair clipper guard sizes explained | Skull Shaver
- Understanding clipper guard numbers: The complete guide — Sacred Barbers
FAQ
What do the numbers 1, 2, 3, 4, and 5 mean in haircuts?
Each number refers to a clipper guard size that sets the length of hair left after cutting. A #1 leaves about 3 mm, a #2 leaves about 6 mm, a #3 leaves about 10 mm, a #4 leaves about 12.7 mm, and a #5 leaves about 16 mm.
Is a #7 or #8 guard shorter?
A #7 guard is shorter, leaving approximately 22 mm (7/8 in) compared to the #8, which leaves 25.4 mm (1 in). Higher numbers always mean more length.
Is a #3 or #4 guard shorter?
A #3 guard is shorter, leaving about 10 mm (3/8 in). A #4 leaves approximately 12.7 mm (1/2 in), making it noticeably longer.
How long is a #7 guard haircut?
A #7 guard leaves approximately 22 mm, or 7/8 of an inch. That is long enough to show texture and movement, closer to a longer buzz than a short fade.
Do clipper guard sizes differ between brands?
Yes. The numbering system is a convention, not a universal standard. A #3 from one brand may leave slightly more or less than 10 mm compared to another brand’s #3, so it is best to use guards designed for your specific clipper model for consistent results.


